Websites with beautiful photographs and full-screen images are one of the favourite current trends in web design. Uploading images to your website or blog is a pretty simple process, but if it isn’t done correctly it can seriously compromise your conversions, sales and search engine optimisation.
If your load time is slow, frustrated visitors will quickly abandon your page. Google also uses page load times as a factor in their ranking algorithm. Thus, optimising images for web is a critical part of web design.
Image optimisation is not just for web designers. To ensure the right performance of any website, bloggers and small business owners who usually upload images onto their sites must also learn to properly optimise images for web.
What does optimising images for web mean?
Optimising images for web refers to:
- Reducing the size of the original image file without impacting on its quality, to reduce page load time.
- Adding the appropriate meta-information, to make the image easy to find by search engines.
5 simple steps to optimise your images for web
STEP 1 | Ask first: Does the graphic need to be an image?
Many simple shapes and animations can be achieved with CSS or Javascript, which requires a lot fewer bytes than images. Those XML-based generated images are called Scalable Vector Graphics (SVG) and are supported by all modern browsers.
For example, this simple green star has been created with CSS by using the code below.
<svg width="8cm" height="3cm" viewBox="0 0 1200 400"
     xmlns="http://www.w3.org/2000/svg" version="1.1">
  <desc>Example polygon - star</desc>

  <polygon fill="#dff494" stroke="#dff494" stroke-width="50"
            points="350,75  379,161 469,161 397,215
                    423,301 350,250 277,301 303,215
                    231,161 321,161" />
</svg>
Years ago, if web designers wanted to incorporate fancy fonts into the web design we had to utilise images. Today we can use web fonts instead, which are specially tuned fonts for use on websites using the CSS @font-face declaration.
Web fonts enable the use of beautiful typefaces while preserving the ability to select, search, and resize text, improving the usability of the website. You can find an entire library of open source web fonts at Google.com/fonts.
Font icons are fonts consisting of symbols and glyphs, which can instantly be customised in size, color, drop shadow, etc, with CSS. My favourite open source icon toolkit for websites is Font Awesome.
Although many basic graphic elements can be achieved with CSS, complex visual elements and high-detail images - like photographs or artwork - will require the use of raster images.
STEP 2 | Select the right image format
A computer can create 2 types of graphics:
- Vector images – they use mathematical equations to represent paths, shapes and lines. They can be scaled up and down as much as needed without affecting their resolution.
- Raster images – they use bitmaps or a grid of pixels to represent an image. They’re suitable for web but they need to be optimised before uploading onto the server. As opposite as vector images, raster images cannot be sized up.
A raster image can have different formats, such as GIF, PNG, JPEG, or one of the newer formats like JPEG-XR and WebP.
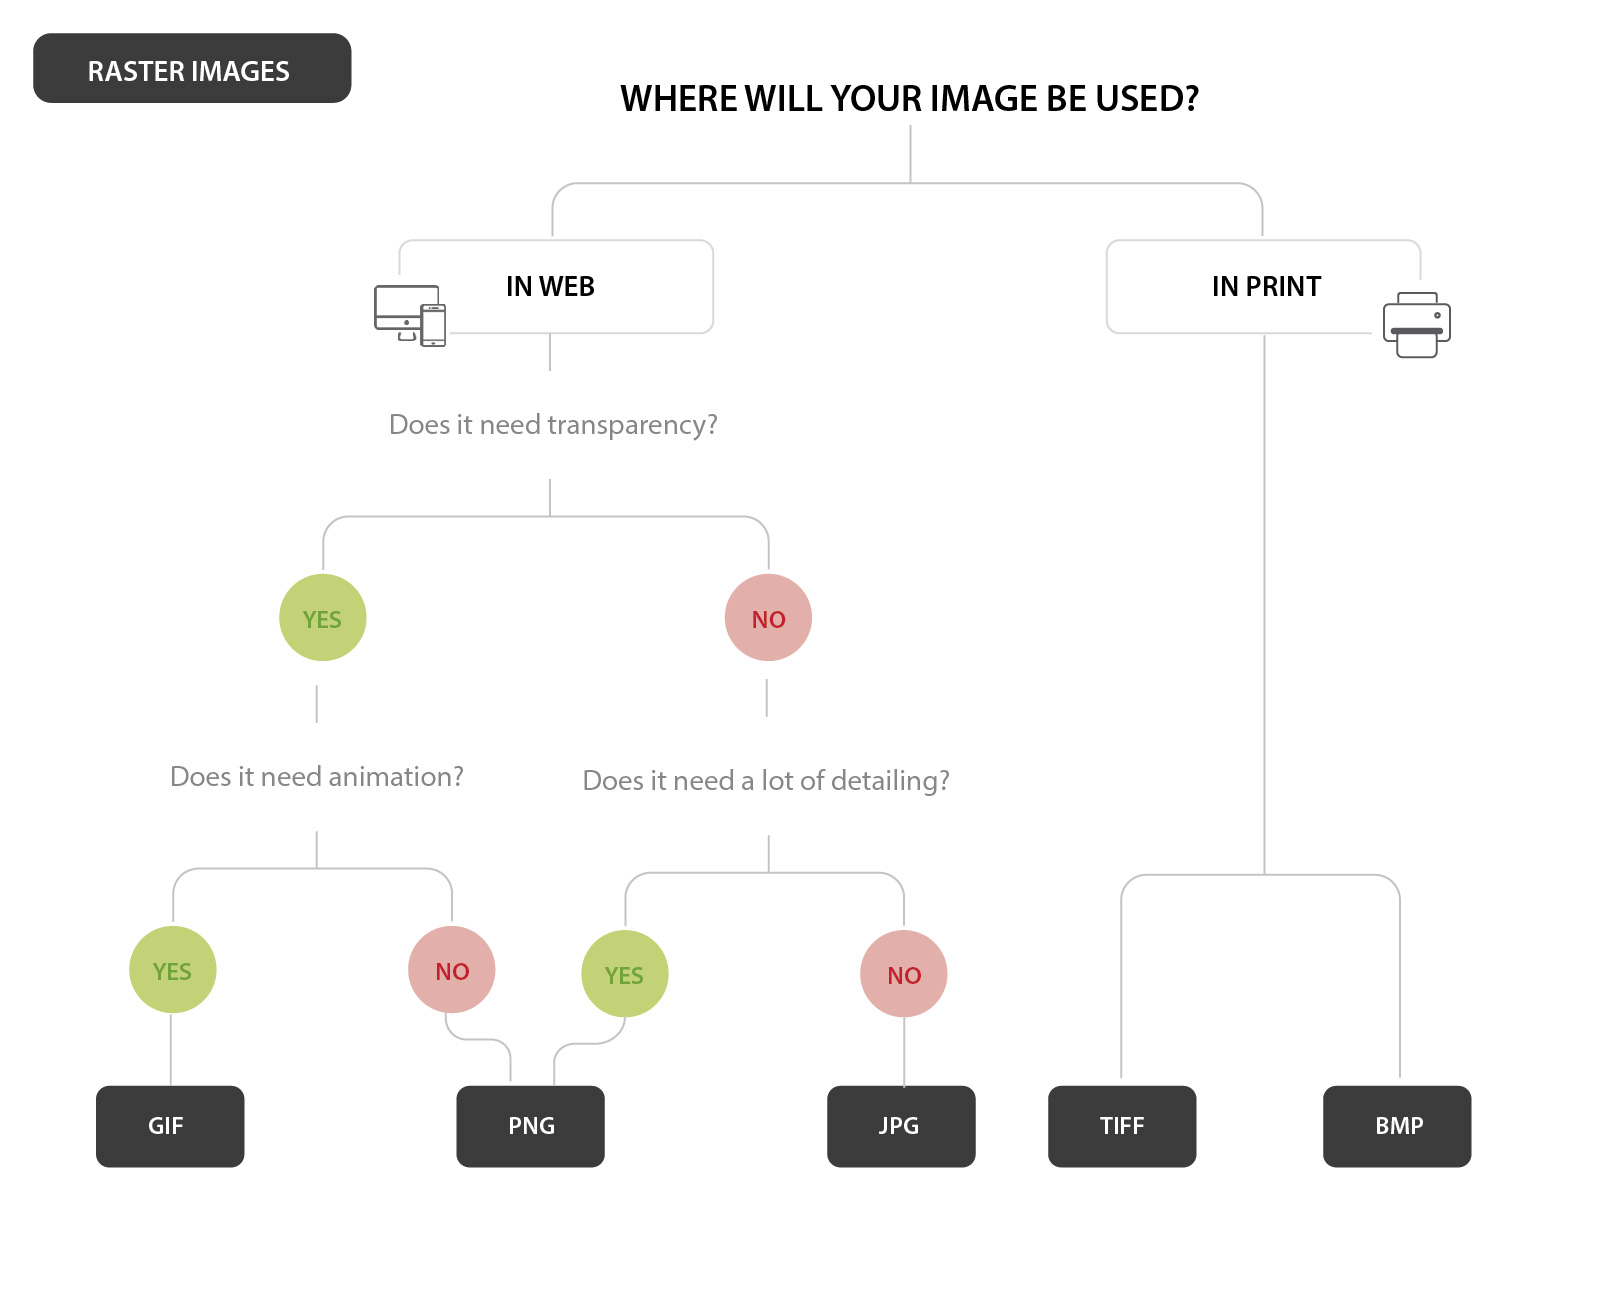
Us, web designers decide on an image’s ideal file format by factoring in aspects like colours, size, density of information and others. This flowchart can easily help you decide the right format for your web image.
As a general rule, the most common format for web images is JPEG. But JPEG files lose a bit of information in their compression and don’t support transparencies or animations, in which case you need to use PNG or GIF images.
JPEG files can be loaded in two different ways:
- Baseline JPEG - it has only one layer containing the whole image. When requested, the entire image is loaded at one go.
- Progressive JPEGs - the image is composed with multiple layers. When requested, the image is loaded layer by layer, which gradually increases in quality.
To ensure your images are loaded progressively, check the “Progressive” checkbox in the Save For Web screen (see below).
STEP 3 | Reduce the image size
Saving an image with the highest quality isn’t right for web. The higher the quality is, the heavier the image gets. By reducing the file size, you are improving your site’s loading speed.
The best way to optimize an image for web is by using the Save for Web command in Adobe Photoshop. This tool gives you a preview of how an image will look after compressed. You can also get an idea of how much it will weigh and how fast it will download.
NOTE: Save For Web feature has been removed from its usual location in Photoshop CC 2015, but it is still available under File > Export menu. Adobe Generator will be the new platform for exporting image assets from Photoshop. Read more here.
If you don’t have Photoshop, Adobe has a free online image editing application at photoshop.com. Alternately you can use GIMP, an open-source image editing software application, same than Photoshop but Free!
Other tools to reduce the size of your images are:
- TinyPNG (online): for PNG or JPG images.
- ImageOptim: For Mac users ONLY. You will have to download this app to your Mac computer in order to use it.
STEP 4 | Name your images descriptively
Use keywords in your image names to help search engines categorise your pictures on image search engine results.
When naming your image files, be as descriptive as possible without using too many characters and keywords to avoid search engines penalisations for over-optimisation.
Separate words with dashes ( - ). Never leave spaces between words (they will be replaced by %20) or use underscores ( _ ) to separate words. Search engines interpret the underscore as a separate character.
For example, to name the flowchart above I've used the following file name: "how-to-choose-the-right-raster-image-format.jpg"
STEP 5 | Add Meta-information
By associating the right keywords with images, you will help your website to achieve better rankings. This association can be achieved through:
- Titles and descriptions, which help search engines understand your site better, improving your SEO ranking.
- Alt tags, which are a text alternative to images used when a browser can't properly render them. The alt attribute also adds SEO value to your website. Don't use alt tags for decorative images, as search engines may penalise you for over-optimisation.
Image optimisation for mobile devices
Your site may be responsive, but it doesn’t mean your images also are. The same images that are served to desktop screens are also served to small devices. However, mobile websites don’t require such large images.
To optimise images for mobile devices use media queries to conditionally hide the larger images and display a smaller version of the same image.
For example, this is how I would display a background image in different devices (by serving three 3 different images with media queries):
<style>
@media (max-width:600px) {
   .image {
      background-image: url(mobile-image.jpg);
   }
}
@media (min-width:600px) and (max-width:960px)  {
   .image {
      background-image: url(tablet-and-ipad-image.jpg);
   }
}
@media (min-width:960px)  {
   .image {
      background-image: url(desktop-and-laptop-image.jpg);
   }
}

</style>

<div class="image"></div>
If your website is built in Wordpress, the mobile optimisation is much easier. WordPress automatically resizes every image into multiple versions – Thumbnail, Medium, Full Size, etc.
Wrap-up
Although, image optimisation can consume a bit of time, this process is an essential part of your website/blog success and key aspect of your search engine marketing.
To know more about image optimisation also read:
- Image Optimization, by Ilya Grigorik.
- Optimize Images For The Web, by Nick Pettit


The revamping of the Oh Flossy play make-up boxes came with a clear brief to create attractive and engaging packaging designs to capture the attention of children as well as their parents. The project goals were well-defined and the result would delight customers and pour great reviews.